
How to Set Up NAS Storage at Home: Step-by-Step Guide for Beginners

Nowadays, everyone is generating and consuming digital content on a large scale. Managing data, such as family pictures and videos, as well as work documents, can become a headache. NAS (Network Attached Storage) provides a consolidated and easily accessible data repository, offering NAS storage solutions for the home. In this guide, you will not only learn about setting up a NAS storage for home, but also find a step-by-step guide on NAS setup at home, which includes comprehensive instructions on NAS installation.
We will also present the most important considerations and a home NAS setup tutorial, as well as practical advice on optimizing the system’s use.
What is NAS and Why Do You Need NAS Storage for Your Home?
NAS (Network Attached Storage) refers to a dedicated file storage device that is connected to a home network for easy access. Think about it as a private cloud. Unlike an external hard drive that interfaces with a single computer, a NAS connects with multiple devices. All devices connected to the network would have access to the NAS device, whether it be a personal computer, Mac,smartphone, tablet, or smart television.
NAS storage for home devices is more beneficial due to its centralized data storage ability. Files no longer have to be scattered across devices; everything can be stored in a single, secure location. It makes backing up data, sharing files with family, and streaming media effortless. A NAS is an efficient digital life manager with a reliable system to protect your data. A helpful companion, especially for someone looking to take control of their data.
Things to Consider When Purchasing the Best NAS Storage for Home
Choosing the best NAS storage for home use might feel overwhelming at first. However, paying attention to a few critical details can simplify the decision. Consider the following key factors when making a purchase of your next NAS storage device:
-
Number of Bays
This refers to the number of hard drives the NAS can store. A 1-bay or 2-bay NAS is suitable for beginners and basic file storage needs. For more serious users who require data redundancy and the option to expand, the 4-bay model is a better choice and is available in higher capacities. More bays mean more storage, RAID options, and expandability.
-
Hard Drives
NAS devices usually come without hard drives. You will need to purchase NAS-specific drives, such as Seagate IronWolf or Western Digital Red Plus, separately. These drives have a lower failure rate when they are used in a multi-drive configuration. Just ensure that you select the appropriate capacity to meet your requirements.
-
Processor and RAM
The NAS’s performance depends on these parts. For applications that require multitasking and media transcoding (such as streaming video file conversions), a more powerful processor and additional RAM are essential. For a basic home NAS setup, a dual-core processor with 1-2GB of RAM is sufficient. For media enthusiasts or those planning to run virtual machines, a quad-core processor with 4GB of RAM or more is a good investment.
-
Software Features
The NAS operating system is what makes it so versatile. Opt for friendly software with features such as automatic backup, mobile access, media server plugins like Plex or Emby, and app stores for additional functionality.Synology’s DSM and QNAP’s QTS are popular and highly-regarded operating systems.
-
Connectivity
Make sure the NAS includes all necessary ports. These should consist of multiple Ethernet ports for link aggregation, allowing for the combination of bandwidth for faster speeds, as well as USB ports for connecting external drives and printers.
-
Price
The price of NAS storage is significantly different depending on the manufacturer. The number of bays and the features included also determine the price. For example, a basic 2-bay model is between $150 and $300. More advanced 4-bay models with more powerful processors will often exceed $500, excluding the cost of hard drives.
Step-by-Step Guide for Beginners on Setting Up a NAS at Home
Here is a step-by-step guide for beginners on setting up Network-Attached Storage (NAS) at home. The process involves choosing the proper hardware, installing the components, connecting to your network, and configuring the software.
Step 1: Choose Your NAS Hardware
Purchasing a NAS for the first time requires the hardware for your NAS. If you are a beginner, buying a pre-built NAS appliance is more recommended than building one yourself (DIY).
- Select A NAS Enclosure: Synology and QNAP are well-known and trusted brands for home users. For new users, a 2-bay model is a perfect entry-level NAS as it is cost-effective and offers RAID 1 data redundancy and affordable storage. Additionally, for users who plan to expand in the future, a 4-bay model offers better expandability.
- Select Your Hard Drives: Choose drives designed explicitly for NAS system use, such as the Seagate IronWolf or Western Digital Red drives, as they are optimized for continuous, 24/7 operation.
- 2TB drives are suitable for basic needs such as storing photos and documents. 4TB drives or larger are recommended for storing large media files.
- You will need two identical drives to enable data redundancy with RAID 1 for a 2-bay NAS.
Step 2: Physical Installation
Once you have your hardware, you can begin the physical setup of the device.
- Install the Drives: Most NAS devices have either tool-less or slide-in drive bays that are easy to use. Insert the hard drives in the empty bays and secure them according to the manufacturer’s guidelines.
- Connect to Your Network: Connect the NAS device to the router using an Ethernet cable. For streaming and transferring files, a wired connection is significantly faster and more reliable than Wi-Fi.
- Plug in the Power: Connect the power adapter to the NAS and plug it into a power outlet.
- Power On: Press the power button and wait a few minutes for the device to boot up.
Step 3: Initial Software Configuration
You will configure the NAS using a computer on the same network as the hardware assembled.
- Access the Web Interface: Like with many NAS devices, the manufacturer usually includes a mobile app or discovery tool for locating the device on the network. Alternatively, you can check the IP address of the NAS on the router’s administration page and then access the NAS using this IP address in a web browser.
- Run the Setup Wizard: Follow the on-screen prompts to start the initial configuration. It will help you install the NAS Operating system, such as Synology’s DiskStation Manager, and set up an administrative account.
- Create Your Storage Pool: In the NAS’s storage manager, you will be guided through creating your storage volume.
-
- Choose RAID 1: Choose a RAID 1 configuration for a 2-bay NAS. It mirrors your data across both drives, ensuring that if one drive fails, your data remains safe on the other.
- Format the Drives: The NAS will format the drives for its file system, such as Btrfs, and initialize the storage pool.
Step 4: Organize and Secure Your Data
Create folders and establish security settings after the initial configurations.
- Create Shared Folders: Set up shared folders for various file types, such as Photos, Documents, and Backups.
- Set User Permissions: For other family members who will use the NAS, create individual user profiles for each of them. After that, you can configure permissions to allow access to specific folders for certain users, enabling them to view or edit content.
- Enable Remote Access: If you want to access your files from outside the home network, you can use the built-in remote access features from trusted manufacturers, such as Synology Quick Connect or a VPN.
- Set Up Backups: Configure your computers to automatically back up information to the NAS. Automated alerts informing about the status of the drives or other critical issues can also be helpful.
Step 5: Start Using Your NAS
You can now connect to your NAS from other devices.
- On a Windows PC: Open File Explorer, navigate to This PC, and click Map network drive to assign a drive letter to your shared folders.
- On a Mac: Open Finder, choose Go > Connect to Server, and enter your NAS’s IP address.
- On Mobile Devices: Download the manufacturer’s mobile app to access files, stream media, and remotely manage your NAS.
What Are the Best Ways to Set Up a NAS for a Home Network?
To set up a NAS device for a home network most effectively, try to integrate it within the existing structure as seamlessly as possible. Here are several essential tips that could help:
-
Centralized Backups
Set up backups for all computers and devices, and use the NAS as the primary target for backups. Most NAS operating systems come with built-in backup tools or are compatible with popular third-party software, such as Acronis and Mac’s Time Machine.
-
File Sharing
Instead of using email to send large files or services like Dropbox, you can create a shared folder on your NAS storage that is accessible to everyone on the network. It enhances collaboration and facilitates more effortless file transfer.
-
Remote Access
Configure remote access to connect to your NAS from anywhere in the world. This allows you to access your files, photos, and media library on the go. You can do this securely through a VPN or the NAS manufacturer’s own services.
Tips for Setting Up NAS for Media Streaming at Home
One of the most popular uses for a NAS storage for the home is media streaming. To make the most of the experience, follow the tips below. The best way to set up a NAS for a home network that supports media streaming is to use a dedicated media server application.
-
Install a Media Server Application
Plex or Emby are the most popular choices. These applications and other similar ones organize your video, music, and photo collections alongside rich metadata (movie posters, actors’ info, etc. Additionally, they transcode files on the fly, ensuring full cross-device compatibility and seamless streaming of various file formats.
-
Optimize Your Network
A wired Ethernet connection is highly recommended for a seamless streaming experience, especially for high-bitrate 4K stream content. If Wi-Fi is the only option, ensure that your routers are powerful and adhere to the latest standards, such as Wi-Fi 6. Placing the NAS in the central part of the house also helps.
-
Consider a Powerful NAS
Transcoding high-resolution video is a resource-intensive task. If you plan on streaming 4K content to multiple devices simultaneously, invest in a NAS storage setup with a powerful processor, such as an Intel Celeron or AMD Ryzen, and ample RAM is crucial. This is a key consideration when a home NAS setup tutorial focuses on a media center.
Direct Macro – Our Top Selling NAS Storage Devices Online
At Direct Macro, we take pride in offering the most affordable and best NAS devices that suit everyone’s needs and budget. We handpick our best-selling models because they are easy to use, reliable, and perform well. Whether you are a beginner looking for an entry-level 2-bay unit or an experienced user needing a powerful 8-bay system for professional use, we have the right solution for you. We offer a wide range of NAS storage for beginners and professionals. We also provide NAS-specific hard drives from the leading industry brands, so you have everything you need for a complete NAS drive setup.
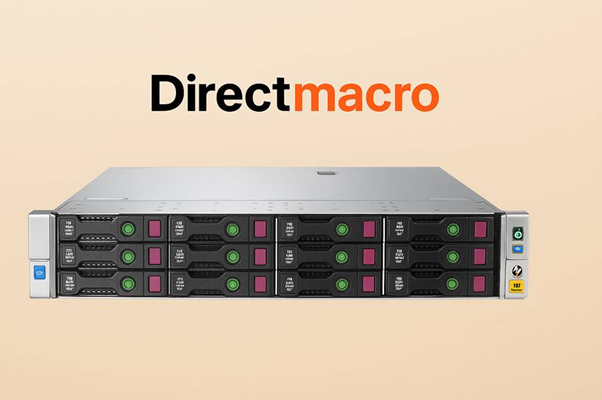
1.HP Store Easy 1650 48TB NAS Storage System
Price
It is a high-end, enterprise-grade product. The price of the HP Store Easy 1650 48TB NAS Storage System varies significantly based on the retailer and configuration, but search results indicate a price range of $12,999 to over $14,000. Direct macro offers high-quality products at low wholesale prices. You can buy this product from our store for just $7,936.56. Book your order now and enjoy the lowest price in the market.
Reasons to Buy
- High Performance: Features an Intel Xeon processor and 16GB of DDR4 SDRAM for demanding workloads.
- Massive Capacity: Comes with 48TB of storage pre-installed (8 x 6TB drives), ready for immediate use.
- Data Protection: Includes robust RAID support (1, 5, 6, 10, 50, 60) and features dual redundant power supplies to minimize downtime.
- Business-Ready: Runs on a pre-installed Windows Storage Server 2012 R2 OS and includes a 3-year warranty.
Reasons to Avoid
- High Cost: The price is very high and typically falls outside the range for small businesses or home users.
- Enterprise-Focused: This is a complex system designed for large-scale business applications and may be overkill for simpler tasks.
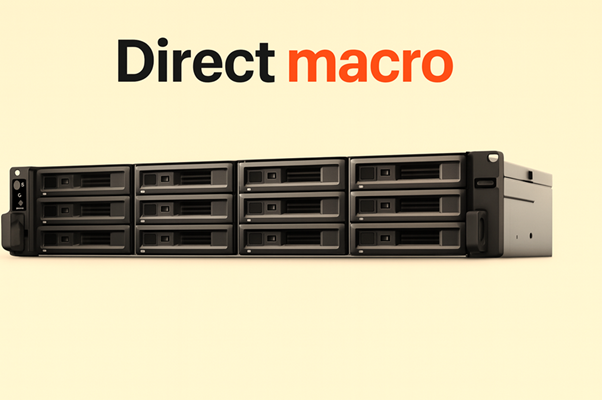
2.Synology NAS 12-Bay Rackmount Storage Expansion Unit
Price
As a diskless expansion unit, its price does not include hard drives. Prices from various retailers range from $5,138.99 to $6,566.98. Direct macro store offers the lowest price for the Synology NAS 12-Bay Rackmount Storage Expansion Unit at $3,192.38. Buy Now.
Reasons to Buy
- Scalable Storage: Provides 12 additional hot-swappable drive bays to expand a compatible Synology NAS.
- High Reliability: Features dual redundant power supplies, essential for uninterrupted operation in a business environment.
- Simple Expansion: Designed for plug-and-play compatibility, allowing you to easily expand your storage online without affecting services.
- Long-term Support: Backed by a comprehensive 5-year limited warranty.
Reasons to Avoid
- Not a Standalone NAS: This is an expansion unit only and must be connected to a compatible Synology RackStation to function.
- Additional Costs: The price is for the enclosure only; you will need to purchase and install hard drives separately.
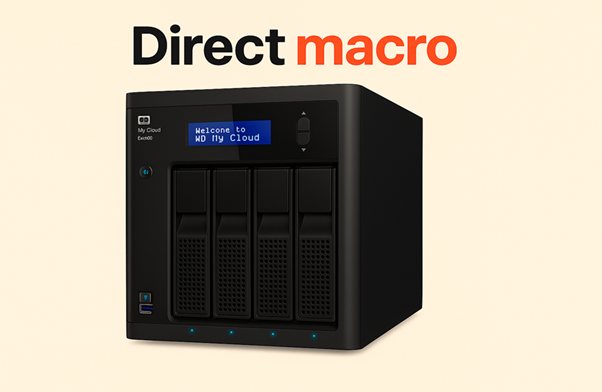
3.Western Digital My Cloud EX4100 Expert Series 4-Bay 8TB
Price
The price for this model is approximately $1,299.99, although pricing may vary by retailer. Direct macro store offers high-quality products at wholesale prices. Purchase Western Digital My Cloud EX4100 Expert Series 4-Bay 8TB NAS storage from our store for just $823.05 and enjoy high-quality products at the lowest rate. Book your order now.
Reasons to Buy
- Ready to Use: Comes pre-configured with two 4TB WD Red hard drives, which are optimized for NAS environments.
- Easy Setup: Features a tool-less, tray-less design for simple drive installation and hot-swapping.
- Powerful Features: The dual-core processor provides fast file transfers, and the device supports multiple RAID options (0, 1, 5, 10, JBOD).
- Enhanced Security: Includes 256-bit AES volume encryption to protect your data.
- Remote Access: Enables secure access to your files from anywhere with an internet connection using the My Cloud app.
Reasons to Avoid
- Mixed Reviews: Some customer reviews indicate mixed experiences with the product, with an average rating of 3.6 out of 5 stars from one source.
- No Redundant Power: Unlike some other products, this model does not have a redundant power supply, which could be a single point of failure.
Final Thoughts
Investing in a (Network Attached Storage) NAS storage for the home is a worthwhile investment in today’s digital age. Managing your data for backups, sharing, or streaming is all too easy for your convenience. By following this NAS installation guide and considering the factors outlined in our NAS Buying guide, you can build a system that perfectly fits your needs.
Keep in mind that you do not require any technical skills to set up a Network Attached Storage (NAS). The benefits you will gain from data organization and the peace of mind it brings will make it worthwhile. For more assistance and details about NAS storage for your home, please contact us at (855) 483-7810 or visit our website for direct information on bulk purchases.
FAQs
- How to configure NAS storage at home?
Setting up NAS storage for the home involves several sequential steps, including physically installing the hard drives, connecting the device to the home network router, completing the online setup wizard, and creating a storage pool with a RAID configuration. The process of creating user accounts and shared folders will be automated and streamlined with the help of the configuration software.
- How to connect the NAS to Wi-Fi router?
You connect the NAS storage to your Wi-Fi router using an Ethernet cable. For optimal stability and transfer speed, the NAS device is designed to be a wired component of your network. Once connected, all devices on your Wi-Fi network will be able to access the NAS, making this the best way to set up NAS for a home network.
- How to share NAS storage with multiple devices?
After setting up the NAS on your network, you can share its storage with other devices by creating user accounts and shared folders. Devices can connect to the NAS using file sharing over the network via standard protocols, such as SMB/CIFS for Windows or AFP for Mac. To access the Network Attached Storage setup, make sure you set the correct user permissions for each folder.
- Can I do NAS setup without IT experience?
Yes! Modern NAS devices are designed for a consumer audience, with user-friendly interfaces and automated setup wizards. A home NAS setup tutorial is now more intuitive than ever. While some technical terms may seem intimidating, most of the process is guided, making NAS setup at home accessible even for those without any IT experience.
Categories
Categories


tags

Expert team support
We accept POs from fortune 1000 companies, government agencies, defense, schools and hospitals.
Do you need advice on buying or selling hardware? Fill out the form and we will return.

Sales & Support
(855) 483-7810
We respond within 48 hours on all weekdays
Opening hours
Monday to thursday: 08.30-16.30
Friday: 08.30-15.30